

Overview
A Service is an amount charged to your client for completing a task. There are two places where Services and Fees can be created/managed, the Settings page and the Companies page.
- The Settings page is where you will create the Services and Fees that will be visible for all of your Clients. Only an Admin user can create Services and Fees that are created in the 'Settings' page.
- The Companies page is where a Custom Service list for a Client can be created. A Custom Service list is a list of services that will only appear for that specific Client.
Related Article:
Common/Standard Services and Fees with Adjuster Payouts : Evolution Global - FileTrac CMS Support (freshdesk.com)
The instructions below will guide you through the process of creating 'Services and Fees' from the Companies page that will only be available for the company in which they are created for. The list of services created for the specified client will also appear at the top of the list when creating a time log.
I. Creating Custom Service and Fees
Follow the step-by-step guide below to create custom services for a company.
1. Click on Companies
2. Type the Company Name in the Filter by Name field and click Enter on your keyboard
3. Click on the Company Name

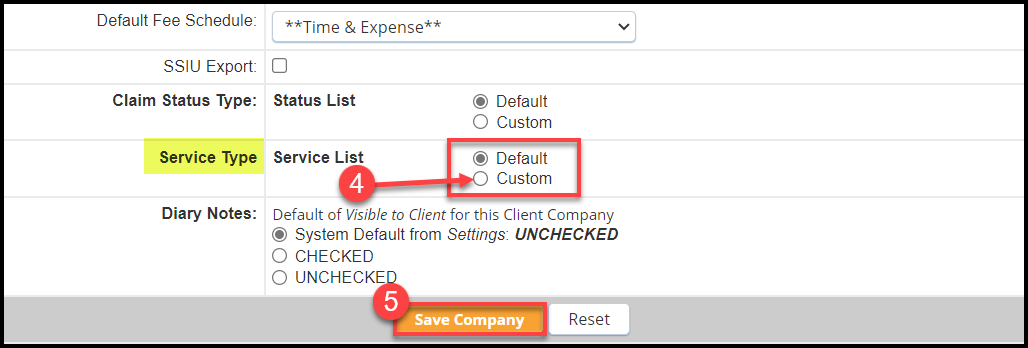
4. Scroll down to the Service Type section and change from Default to Custom
5. Click Save Company
6. Type the Company Name in the Filter by Name field again and click Enter on your keyboard
7. Click on the Company Name

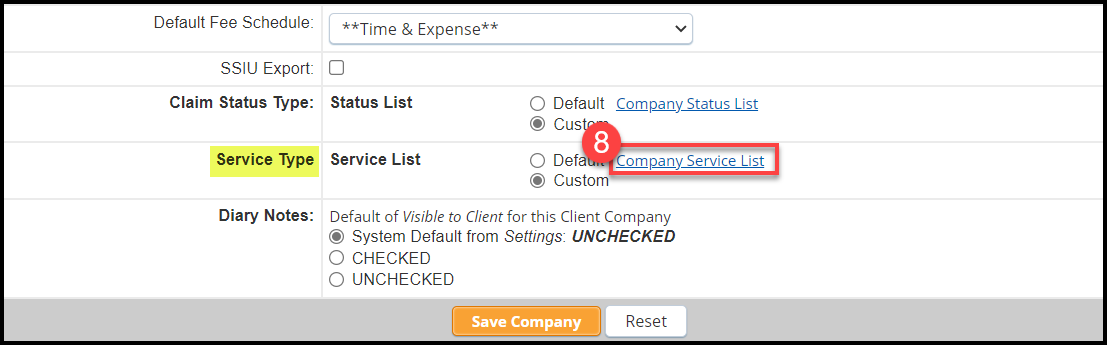
8. Scroll to Service Type and click on Company Service List
*If you will be labeling Services under a category, you will want to add those Categories/Labels before adding the Custom Services. (Ex: Hours can be labeled under category 'Time'.) When a Category/Label is selected for a service, all Service fees for that Label will be grouped together on the invoice.
To add and/or manage Labels, click on 'Add/Edit Category/Labels' at the top of the page.

a) Delete [NEW Label] and enter the name of your Label
b) Click Save

Continue steps (a) and (b) until all Labels have been created.
Then click on the Companies tab and repeat steps 6-8 above to return to the Service list
for that Company.
9. Check the box “Check box to add a new service”
10. Delete "New Service" from the Service Name field and enter the name of your Service. You can add a Description to default on the time log entry and show on your invoice. Then choose whether this service is Viewable or Hidden, and either Non-Hourly or Hourly.
 'Hidden' is only for Admin use and will not appear for other users when entering time on the Timelog page. (Hidden is also to be selected for services that are no longer being used.)
 11. Category/Label (Optional): Select the Category/Label from the drop-down menu.
12. Rate or % (Optional): This field represents the $ rate for this service unless the 'Upon Invoice Creation' option is selected, in which case it represents a % value. Both values should be expressed as whole numbers followed by (if applicable) a decimal point up to three digits.
-For $: 75, 75.1, 75.15, and 75.155 are all valid.
-For % (if 'Upon Invoice Creation' is selected): Twelve percent should be expressed as "12". Two point two five percent should be expressed as "2.25".
13. Taxable or Reimbursable (Optional): Select either or both if they apply to this service.
14. Apportionment (Optional): If your company pays an apportionment, select either % or $. The apportionment, along with the payout rate can be configured after saving.
15. Automate (Optional): Automated entry can be applied 'Upon File Creation' (such as an Admin fee) or as a percentage of a service fee 'Upon Invoice Creation'.
Upon File Creation- If you want an amount of this Service Fee to be applied Upon File Creation, enter that here. If not, keep as zero. (Ex: one admin fee is allowed on each claim, enter the calculation “1”.)
Upon Invoice Creation- To add the service charge as a percent of a fee, select the fee from the drop-down list. NOTE: If an invoice is edited, then the percentage must be manually updated.
16. Click Save all changes

Repeat Steps 9 through 16 until all services have been added.
If a default Service has not already been selected from the list of services located on the Settings page, you will also have the option to select a default Service. If a Service has already been selected as a default, the box for 'Default Service' will be disabled.
II. Setting up the Adjuster Payout for the Custom Services
Once the Service has been Saved, you will be able to configure any Apportionments (if applicable) and the Payout Setup. To set up the Adjuster Payout:
1. Click on Payout Setup for a given Service

2. You can choose to either Set as Rate for ALL EXISTING Adjusters (Option 1), or Set Rates for Adjusters individually (Option 2)
Option 1: Choose this option if the same rate applies to All Existing Adjusters
 If the same rate applies to most of your adjusters, you may choose Option 1, click 'Update Adjuster(s)', then change the User Payout on the adjuster(s) that have a different rate. Then click 'Update Adjuster(s)' again, and 'Close Page'.
Option 2: Choose this option if you wish to set the rate individually for each Existing Adjuster
3. Select if the payout is based on a % of the Fee or Amount/Quantity
4. Type in the User Payout amount
5. Click on Update Adjuster(s)
6. Click 'Close Page'

Repeat steps 1-6 above for each Service created for this company.